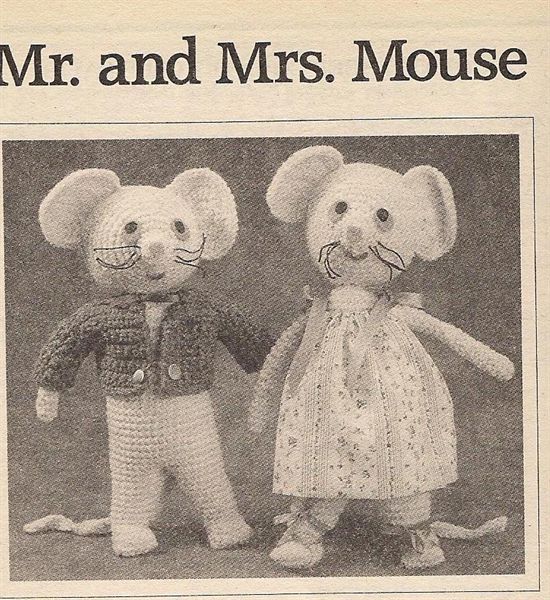
Such a charming couple. Mr. and Mrs. Mouse are crocheted of 4 ply worsted weight yarn; Mrs. Mouse’s frock is sewn.
Each measures about 14 inches tall.
To make the pair, you will need 9 ozs. of 4 ply yarn in orchid and 2 ozs. of taupe (for Mr. Mouse’s jacket), a size H crochet hook, or size required to obtain given gauge, polyester stuffing, scraps of blue, black, red and pink,felt and black cord. For Mr. Mouse you will also need 1 yrd 1/4 inch green ribbon and two 5/8 inch gold buttons. For Mrs. Mouse, you will need a 9×18 inch piece of printed fabric and 1 1/2 yds each of 1/4 inch and 1/2 inch wide lavander ribbon.
GAUGE:
4sc equal 1 inch
4 rnds, equal 1 inch
TO SAVE TIME, TAKE TIME TO CHECK GAUGE.
Mr. Mouse
HEAD
Starting at nose, with orchid, ch 4. Join with a sl st to form ring.
Rnd 1: Ch 1, work 6 sc in ring. Do not join rnds but carry a contrasting color yarn up between last and first sc to indicate beginning of each rnd.
Rnd 2: [Work 2 sc in next sc,(inc made), sc in next sc] 3 times- 9 sc.
Rnd 3: Sc in first sc, (inc in next sc, sc in next sc) 4 times – 13 sc.
Rnd 4: (Sc in next 2 sc, increase in next sc) 4 times, sc in last sc – 17 sc.
Rnd 5: ( Sc in next 2 sc, inc in next sc) 5 times, sc in last 2 sc – 22 sc.
Rnd 6: Sc in next 3 sc, inc in next sc( sc in next 2 sc, inc in next sc) 5 times – 28 sc.
Rnd 7: (Sc in next 3 sc, inc in next sc) 6 times, sc in last 4 sc – 34 sc.
Rnd 8, 9: Sc in each sc around.
Rnd 10: Sc in first 2 sc, ( inc in next sc, sc in next 7 sc) 4 times – 38 sc.
Rnd 11: Sc in next 5 sc, (inc in next sc, sc in next 8 sc) 3 times, inc in next sc, sc in next 5 sc – 42 sc.
Rnds 12 through 20: sc in each sc around.
Rnd 21: *Draw up a lp in each of next 2 sc, yo and draw through all 3 lps on hook ( dec made) , sc in nex 3 sc. Repeat from * around, end last repeat with dec over last two sts – 33 sc. Stuff head as work progresses.
Rnd 22: *Sc in next sc, dec over next 2 sc. Repeat from * around.- 22sc
Rnd 23: *Sc in next sc, dec over next 2 sc. Repeat from * around.- 15 sc.
Rnd 24: * Dec over next 2 sc, sc in next sc. Repeat from * around. Leaving a 10 inch length of yarn, fasten off. Draw this end through remaining 10 sts, pull tightly together and secure.
EAR: (make 2) With orchid, ch 2,
Row 1: Work 3 sc in 2nd ch from hook. ch 1, turn.
Row 2: Sc in first sc, inc in next sc, sc in last sc – 4 sc, ch 1. turn.
Row 3: Sc in first sc,( inc in next sc) twice, sc in last sc. – 6 sc, ch1, turn
Row 4: Sc in first sc,(inc in next sc) 4 times, sc in last sc. – 10 sc, ch1, turn.
Row 5: Sc in first 2 sc, (inc in next sc) 6 times, sc in last 2 sc – 16 sc. ch1, turn.
Row 6: Inc in first sc,( sc in next 2 sc, inc in next sc) 5 times.. Ch 1, turn.
Row 7: Sc in each sc across.- 22 sc. Leaving 16 inch length of yarn for sewing, fasten off. Sew streight edge of each ear to center top of head. Leaving a 2 inch space across top of head between ears as shown.
BODY: Starting at neck edge, work as for head until Rnd 3 has been completed – 13 sc.
Rnd 4: ( Inc in next sc, sc in next sc ). 6 times, inc in last sc – 20 sc.
Rnd 5: (sc in next 2 sc, inc in next sc,) 6 times, sc in last 2 sc – 26 sc.
Rnds 6 through 12: Sc in each sc around.
Rnd 13: ( sc in next 2 sc. inc in next sc) 8 times, sc in each of last 2 sc – 34 sc.
Rnd 14: ( Sc in next 4 sc, inc in next sc) 6 times, sc in last 4 sc – 40 sc.
Rnd 15 through 26: Sc in each sc around. At end of last rnd ch 4,drop lp from hook, stuff body, remove contrasting color marker.
WORK FIRST LEG AS FOLLOWS: Sk next 19 sc, place safety pin in next st for marker. insert hook in next st and draw dropped lp through, ch 1,sc in same st the dropped lp was drawn through., sc in next 19 sc, sc in next 4 ch sts. Place contrasting color yarn between last and next sc and carry up as before.
Rnd 2: Sc in next 20 sc,( dec over next 2 sts) twice.
Rnd 3: Dec over next 2 sts, sc in next 18 sc, dec over next 2 sts.- 20 sc.
Rnds 4 through 11: Dec over next 2 sts, sc in each sc around.- 12 sc on last rnd.
Join with sl st in next sc. Remove contrasting color yarn and stuff leg.
WORK IN ROWS AS FOLLOWS:
FRONT SECTION OF FOOT.
Row 1: Ch 1, sc in joining, sc in next 5 sc, do not work across remaining 6 sc, ch 1 turn
Rows 2 through 10: sc in each of 6 sc across, ch 1, turn.
at end of row 10 leave a 16 inch length of yarn for sewing. Fasten off.
Sew the 6 sts on last row to corresponding 6 sts on row 1, Sew side seam . Stuff foot and sew other side seam.
SECOND LEG: Join yarn to opposite side of next ch following marked st., remove pin.
Rnd 1:Ch 1, sc in same st where yarn was joined, sc sc in opposite side of next 3 ch, sc in next 20 sc – 24 sc. Place contrasting color yarn between last and next sc and carry up as before.
Rnd 2: (Dec over next 2 sc) twice, sc in each remaining 20 sc. Starting with Rnd 3 work as for first leg to front section of foot.
FRONT SECTION OF FOOT:
Row 1:Sl st to next 5 sts. ch1 sc in next 6 sc, ch 1, turn Starting with Row 2 complete as for other foot.
Sew head to body as shown.
ARM: ( Make 2) Starting at upper arm with orchid, ch 7, Join to sl st to form ring.
Rnd 1: Ch 1, sc in each ch around – 7 sc. Place contrasting color yarn between last and next st and carry up as before.
Rnds 2 through 17: sc in each sc around. Stuff as work progresses. at end of rnd 17 leaving a 16 inch length of yarn, fasten off. Draw end through sts on last rnd, pull together.
Sew rnd 1 of each arm to body as shown.
TAIL: With orchid, ch 35, sc in 2nd ch from hook and each ch across. Fasten off. Sew tail in place.
FEATURES: (features may be sewn rather then glued). For eyes cut 2 pieces of blue felt each about 1 3/4 inches, trim to an oval shape. Glue in place. Cut 2 circles of black felt each 1/2 inch in diameter, glue onto blue felt, With pink felt cut a circle 1/2 inch in diameter, glue onto tip of nose With red felt cut crescent shaped mouth about 3/4 of an inch from side to side. For whiskers cut 3 lengths of black cord each 7 inches long. draw through sts on nose as shown. having 3 inch ends on each side of nose and leaving a space between each end on face.
JACKET:
BACK: Starting at lower edge with taupe, ch 21.
Row 1: Sc in 2nd ch from hook and in each ch across – 20 sc.,ch 1, turn
Row 2 through 7: Sc in each sc across, ch 1 , turn.
ARMHOLE SHAPING: Row 1:Dec over first 2 sc, sc in each sc to within last 2 sc, dec over last sc., ch1, turn
Rows 2 through 5: sc in each sc across.- 18 sc. Ch 1, turn, at end of last row fasten off.
RIGHT FRONT: Starting at lower edge with taupe, ch 11,
Row 1: Sc in 2nd ch from hook and in each ch across, Mark beginning of row for front edge.Ch 1, turn.
Rows 2 through 7: Sc in each sc across, Ch 1, turn
ARMHOLE SHAPING: Row 1: Dec over first 2 sc, sc in next 8 sc. Ch 1, turn.
Rows 2,3: Sc in each sc across.-9 sc, Ch 1, turn.
NECK SHAPING: Row 1: sl st in first 4 sc, sc in next 5 sc, Ch 1, turn
.Row 2: Sc in next 5 sc. Fasten off.
LEFT FRONT: Work as for right front until row 1 is complete. Mark end of row for front edge.Ch 1, turn.
Rows 2 through 7 repeat rows 2 through 7 of right front.
ARMHOLE SHAPING: Row 1:Sc in each sc to within last 2 sc dec over last 2 , Ch 1, turn.
Rows 2.3: repeat rows 2 and 3 of right front.
NECK SHAPING: Row 1:Sc in first 5 sc, do not work across remaining sts. Ch 1,turn.
Row 2: Sc in each of next 5 sc. Fasten off.
SLEEVES:( MAKE 2) Starting at lower edge with taupe, ch 13.
Row 1: sc in 2nd ch from hook and in each ch across – 12 sc.
Rows 2 through 9: Sc in esch sc across, Ch 1, turn. At end of last row fasten off.
Sew shoulder, side and sleeve seams. Sew in sleeves. One inch up from lower edge sew a button 1/2 inch in from each front edge. To form lapels, turn down each neck shaping and tack in place as shown. With green ribbon around neck tie bow at front.
MRS. MOUSE: Omitting jacket, work as for Mr. Mouse.
DRESS: Fold fabric in half, cut into two 9 inch squares. With right sides together, mark 1 end of each square for top edge of dress.Pin fabric along 2 sides, sew side seams to within 1 1/2 inches of top edge. Fold each top edge 1/4 inch to wrong side, Sew hems, To make armholes, fold fabric under at slight angle, Sew in place. Turn fabric right side out. Make running sts along each top edge. Gather each edge to fit across front and back of mouse as shown. Secure thread. Turn up and sew a 1 1/2 hem at bottom edge. Cut 1/2 inch wide lavander ribbon into 4 equal lengths. Sew one end of each length to front and back top edges at armholes Tie into bows at shoulders as shown. Cut 1/4 inch wide lavander ribbon in half. Wrap one length of each ribbon around each foot and tie into bow at ankles as shown.
One thought on “Mr. and Mrs. Mouse”
Lovely couple !
I’m enjoying your site !
Grts.Marja
Lovely couple !
I’m enjoying your site !
Grts.Marja