 |
 |
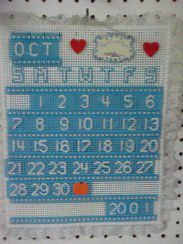
PLASTIC CANVAS CALENDAR INSTRUCTIONS
Materials: 2 sheets of white or cream colored plastic canvas size 7 mesh
2 sheets of colored of your choice. size 7 mesh
1 skin of white 4 ply worsted weight yarn
Cut plastic canvas as follows: with colored canvas count holes rather then threads.
15-pieces 3 holes X 66 holes.
15-pieces 1 hole X 66 holes (this can be clear plastic as these are the risers or runners and will not be seen).
12-pieces 8 holes X 20 holes for the months.
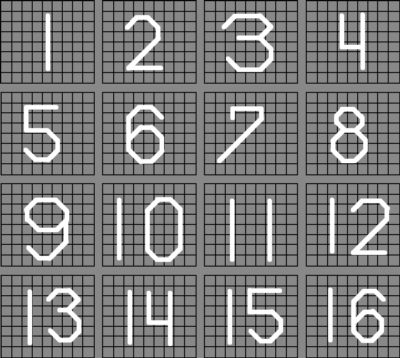
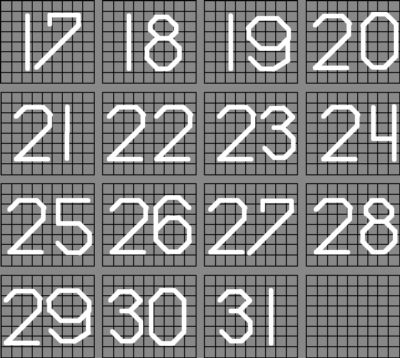
31-pieces 8 holes X 9 holes for numbers.
9- pieces 8 holes X 9 holes for holidays.
Approx. 2 yards gathered lace.
One wooden decoration for top.
2-pieces 3 holes X 20 holes for current month.
2- pieces hole X 20 holes for risers.
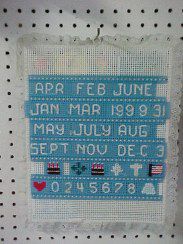
ASSEMBLY: On one white or cream sheet of canvas count 4 holes over and 5 holes down. Place 1 x 20 piece on 5th row down from top place 1 3×20 piece on top with the 1×20 piece being on the bottom centered under the 3×20 piece this forms the riser. Count down 10 holes from last hole in the 3×20 piece, place another 1x 20 piece riser with a 3×20 piece centered on top. Starting from the back of the white piece with yarn bring your needle up from the back through the center hole of the 3×20 piece and sew with a running stitch, knotting off in the back at the end of the row. Follow the same steps for the bottom runner, this will hold the current month. skipping a row of holes on the white canvas start sewing on the letters for the days of the week S-M-T-W-T-F-S. It is better to use one continuous piece of yarn for this , running the yarn on the back to the next letter. skip 3 rows of holes on the white canvas. On the 4th row lay a 1x 66 hole riser with a 3x 66 runner centered on top. Sew down the center hole with yarn all the way across. Skipping 7 rows of holes place another riser ( 1 x 66 piece) on the 8th row, place a 3 x 66 runner centered on top of the riser and sew in the same manner as the first runner. Repeat this process until you have a total of 7 – 3x 66 runners on the white piece. This will hold the numbers. On the other white piece: Starting 16 rows down from the top on the white piece. place another riser with runner using the same method as before. Skipping 7 rows of holes between each runner. Place 7 risers with runners centered on this white piece. This will be the back piece of the calendar and will hold the unused months and holiday pictures. Counting over 35 holes for the center of the white piece sew on a small 1/2 inch bone ring for hanger. Holding the two white pieces together. Right sides out, sandwich the lace between the two pieces and sew together using a running stitch. Gather the lace slightly at the corners so the lace will lay flat.
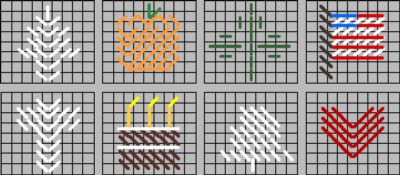
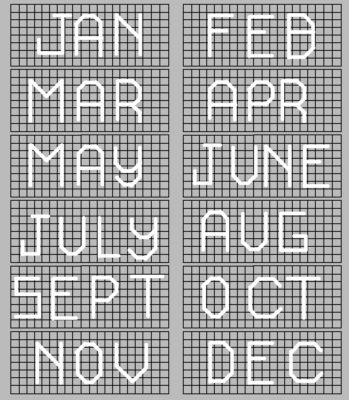
Here are the diagrams for the holidays and months.

what size for plastic canvas sheet? 7 or 10 mesh
Hi Joan, thanks for visiting my website.
For the plastic calendar you will need 7 mesh plastic canvas.
This reminds me of the one always hanging up in Grandma house and couldn’t wait to change the months and dates.
I am curious to find out what blog system you are utilizing? I’m having some minor security issues with my latest site and I would like to find something more risk-free. Do you have any recommendations?|
word press is very good
Thank you for the patterns for the months/numbers! I am teaching my son how to make these this summer.
Hi Barbara,
Thanks for visiting my website. So glad I could help. If there is any other pattern I can help you with, just let me know.
Just a suggestion….How about an addition of interwound circles to represent wedding bands for an anniversary….Any suggestions for a bunny for Easter….or how about ti spell out Mom`s Day. or Dad`s Day….Just a suggestion… 🙂 Thanks for listening..
Hi Barbara,
Thanks for visiting my website.
and also for the good ideas on the calendar, I will have to see what I can work out.
My grandma made me one of these calendars when I was about 8 years old and I loved it but about a year ago I was in a domestic violence relationship and had to leave all my stuff behind for safety reasons and this is one of the things I loved the loved the most. My grandma is now 98 years old and isn’t doing well at all so I was so happy to see that there was instructions on how to make this on line, so I can try and make me one. I’m not sure it will come out Im not very crafty do you or do you know anybody that sells these real cheap or anybody that will make me one please it means a lot to me
Hi Jamie,
thanks for visiting my website,
I Made the calendar that you see there, If you like I will make you one. The price is $35.00 If you decide you want one, send me an e-mail at craftngranny@comcast.net
I’m having trouble assembling the plastic canvas calender. I have all the materials needed and am getting ready to assemble them help!!!!
HI Robin,
How can I be of help? What part is giving you trouble? Let me know and I will try and work it out for you.
Hi I’m anxious to start this project. What size for calendar? I’ve read over what to cut and instructions many times and cannot find that part. Thanks in advance
I need to make the holiday pattern and I do not know where to find them
Just wondering how you change the numbers for each month, would it mean you have to move them every month?
Wondering if i do the days of week in singles that it would be easier to just move the days around. Do you think this would be too confusing?
Ty for the pattetn, my oarents have one from about 15 yrs ago, so i am trying to replace it for them.